Tiddlyserver
Introduction
The impending extension-pocalypse that is Firefox 57 will mean the end of the Tiddlyfox saver add-on for Tiddlywiki. Goodnight sweet prince.
Fortunately, we already have a replacement, thanks to the awesome work of Arlen Beiler, who has given us Tiddlyserver.
The unfortunate thing is that, for now at least, we probably still need a command-line/terminal (though maybe not!).
At the moment, we also need to use a text editor to edit and rename a configuration file. This is sub-optimal, but we can do it!
The instructions given by Arlen are very thorough, but still quite technical. I'd like to try and boil it down a little bit.
The basic steps are as follows
- Install Node.js
- Download and Unzip Tiddlyserver
- Edit the settings file
- Run the Server
What You'll Get
What you get for the trouble of setting up and running Tiddlyserver is an in-browser file-explorer that lets you navigate to your single file wikis and use them with auto-save. You can also navigate to directories that contain Tiddlywiki.info files and the Node.js server will start.
This is a big win for both those who wish to keep using the single-files for convenience and also for those who prefer the Node configuration, because now they won't need a separate instance/port for each wiki.
If you use Tiddlywiki on a machine connected to a local network, another potential benefit is that you can allow access to the server from other machines on the network, meaning for example that you will be able to edit your wikis on a phone or tablet.
What You Need
You need to install Node.js, which you can do just like any other app, from here: https://nodejs.org (the LTS, "Long Term Support" version will be best for most people)
Then you need to download and install Tiddlyserver itself. To do so, go here: https://github.com/Arlen22/TiddlyServer/releases and download the most recent bundled zip file (currently TiddlyServer-2.0.6-bundled.zip). Once you have the file, unzip it.
Settings
Now we need to create a file called settings.json in the directory we just downlaoded.
You can either follow the steps and reasoning outlined below, or skip to the next section to see what the final contents of settings.json might be.
In the folder you just created, you can find the file example-settings.json and open it in an editor.
If you don't normally use an editor, you probably nevertheless have one installed and 'double-clicking' the file may well open it in a suitable app that shouldn't be too hard to use.
We need to change a lot of things in this file. To begin with, it looks like this:
{
    // all comments need to be removed from this file
    "tree": {
        "dropbox": "C:\\Users\\Someone\\Dropbox\\TiddlyWiki",
        "tiddlywiki": "C:\\TiddlyWiki5-5.1.14",
        "relative": "../relative_to_settings_file",
        "branch": {
            "twig1": "C:/Some Folder",
            "twig2": "C:/Some Other Folder"
        }
    },
    //this is the default value if types is not specified
    //this only applies to the directory listing
    //specifies file extensions for each icon in the files folder
    "types":{
        "htmlfile": ["htm", "html"]
    },
    "username": "",
    "password": "",
    //127.0.0.1 (the default) serves on localhost, 0.0.0.0 serves on all network connections.
    "host": "127.0.0.1",
    "port": 8080,
    //remove or set to an empty string to disable backups when saving single-file wikis
    "backupDirectory": "backup"
}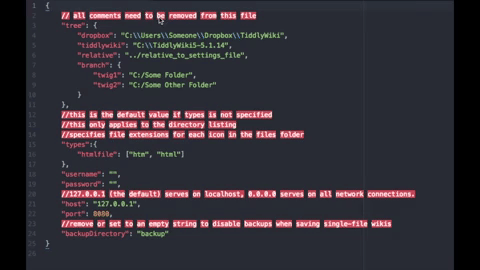
As it says, we need to remove all the comments.
We also need to change the entries in the 'tree' at the top to match the places on our filing system we want to serve files from.
If we want to serve files to the whole network, we should change 127.0.0.1 to 0.0.0.0 (we've done this below but you can leave it as 127.0.0.1 if you want to restrict access to just your own machine).
If we want to, we can change the port number to something else (if you don't know what this means, there's very little chance you would need to change it).
Important: We also need to make sure that the backupDirectory entry points to a directory that actually exists, or we'll get a silent error.
If you don't want a backup directory at all leave the value blank, as shown in the listing below, otherwise you can enter an absolute path (such as /Users/didaxy/backups) or a path relative to the Tiddlyserver folder you downloaded (eg; if there's a folder inside the Tiddlyserver folder called 'backups', the value would be "./backups" or just "backups".
Once we've made the changes we need to save this file with a different name (usually 'save as' or similar'). It needs to be called settings.json.
The result should look like this looks like this:
settings.json
{
    "tree": {
        "mac_everybody": "/Users",
        "windows_everybody": "C:\\Users"
    },
    "types":{
        "htmlfile": ["htm", "html"]
    },
    "username": "",
    "password": "",
    "host": "0.0.0.0",
    "port": 8080,
    "backupDirectory": ""
}
Note that the only difference between Windows and Unix/Mac is the style of the paths. I've included an example of each here, you should delete the one that doesn't apply.
You can add as many entries as you like and they can be nested too, as shown in example-settings.json, but they don't need to be. The simplest configuration is a single entry.
Running Tiddlyserver
Now we can run Tiddlyserver.
I think that if you're using Windows(tm), you should be able to double-click start.cmd and the process should run. (is that right?)
If you're using a Mac, a similar mechanism is also possible, but the file you need isn't included yet (I sent a pull request: Hi Arlen!)
Using the Command Line
To run the app from the command line, you need to open the terminal and navigate to the directory you downloaded. If you're not used to using the command line at all, this is where it could all get a bit tricky. I'm trying to write A Crash Course in the Mac Terminal to try and help people get to grips with it, but it's currently incomplete.
You don't need to know much but you need to figure out how to get to wherever the folder is that you downloaded.
When you open the terminal, you will probably be in your own home directory. You can check by typing pwd. If you downloaded Tiddlyserver into your Downloads folder, you could get there by typing cd /Downloads where you could ls the contents of the folder and you should see the Tiddlyserver folder in the listing. Then you can cd Tiddlyserver to get into Tiddlyserver folder. To change directories back to your home directory, you could do just cd. To jump straight back to the Tiddlyserver folder, from anywhere, you could type cd ~/Downloads/Tiddlyserver, where ~ is a special character that always means "your home directory".
Once you're in the Tiddlyserver folder, to start your server, you can type;
node server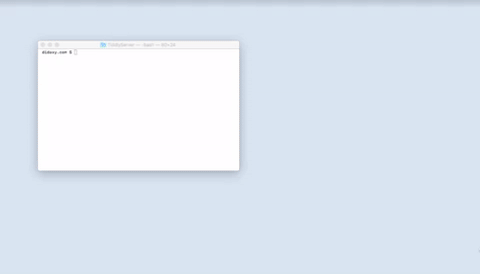
You should see a message in your terminal, telling you that Tiddlyserver has started. It will give you the ip address and port that it's running on, which you can enter in the address bar of your browser to see the main file-explorer view.
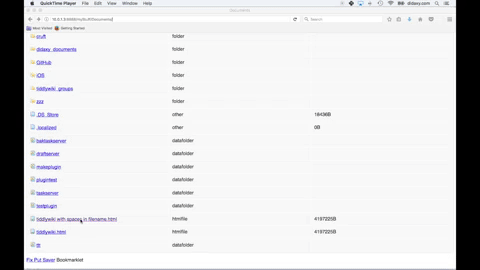
Using Tiddlyserver
You should see each of the entry points that you defined in settings.json listed as clickable links that will let you navigate just like in the regular explorer/finder.
Note that you can now open this address in as many different browser tabs as you like (and in any browser).
Opening a folder that contains a Tiddlywiki.info file (ie; one that has been previously initialised using tiddlywiki --init server) will launch the Node server.
Opening a single-file Tiddlywiki instance will open it as you would expect. When you open one for the first time, you should check that you're able to save changes.
The 'Bookmarklet'
You only need the bookmarklet if the path to your files contains spaces or the % sign. It's patching a bug in Tiddlywiki's 'put saver' that will be patched in the next release.
You can drag the link from the bottom of the file-explorer view of Tiddlyserver to your bookmarks bar and then, when you open a wiki that has spaces in the path, click that bookmark and a snippet of Javascript that fixes the problem will run
It's better, in general, avoid having file paths that contain spaces :-)
Stopping and Restarting
To stop Tiddlyserver, you can press 'ctrl-c' in the terminal. If you want to start it again, you can retype the command, or press the up arrow key to go back through the history to find it again and press return.
The server is running as a process in your terminal 'session' and if you close the terminal, Tiddlyserver will end. This is generally the easiest behaviour to manage but if need the server to run with the terminal closed, you can add a " &" to the command (ie; node server & which will run it in the background (and give you a process number which identifies it). You'll then need to manually stop it when you need to, using sudo kill #, where # is the number of the process (find it in the listing from pas aux | grep server if you forgot it).
Summary
Tiddlyserver isn't very difficult to install today. It's really useful and so far seems very stable.
For most people looking for a solution to the end of Tiddlyfox, this is probably the best option.
Having said that, it isn't yet the perfect solution for everyone and we can still make it easier to use.
Future Developments
These are just my thoughts on what might make this better.
- An app launcher for Mac, a 'better' launcher for Windows (icons etc.)
- Maybe pack the whole thing along with node as a single downloadable? - (https://github.com/nexe/nexe ?)
- Add a default 'settings.json' to the repo that works so that it can be launched without needing to create it first.
- Ability to change configuration (and reboot, which is probably the hard part?) from inside the interface
- Ability to add new files and folders from within the interface - bonus points if it can instantiate server editions too
Congratulations
Congratulations must go to Arlen Beiler for what I really feel is a very good piece of work, which will become an important part of the Tiddlywiki ecosystem.
Credits
With thanks to Arlen for further clarifications and patient explanations, and to @JWHoneycutt and @Birthe C for their feedback. Any further suggestions will be gratefully received.